1. Agentic Coding/Vibe Coding?
Set up
- GitHub account at github.com/signup. Pick a username you will put on a résumé. This will be part of your public site URL later.
- OpenRouter account at openrouter.ai. Go to openrouter.ai/settings/keys, click Create Key, copy the key that starts with
sk-or-, and save it in a note. No credit card required. - Node.js 20 or newer (optional, only if you install OpenCode via npm) from nodejs.org. Pick the LTS version. On Windows, keep "Add to PATH" checked during install. Verify with
node --versionin any terminal. Skip this if you use the curl installer on Mac.
What changed
For fifty years, using a computer to do anything useful meant writing code. Rules in a language the machine understood. If you couldn't code, you couldn't automate. Whole fields were stuck not for lack of ideas but for lack of people who could implement them.
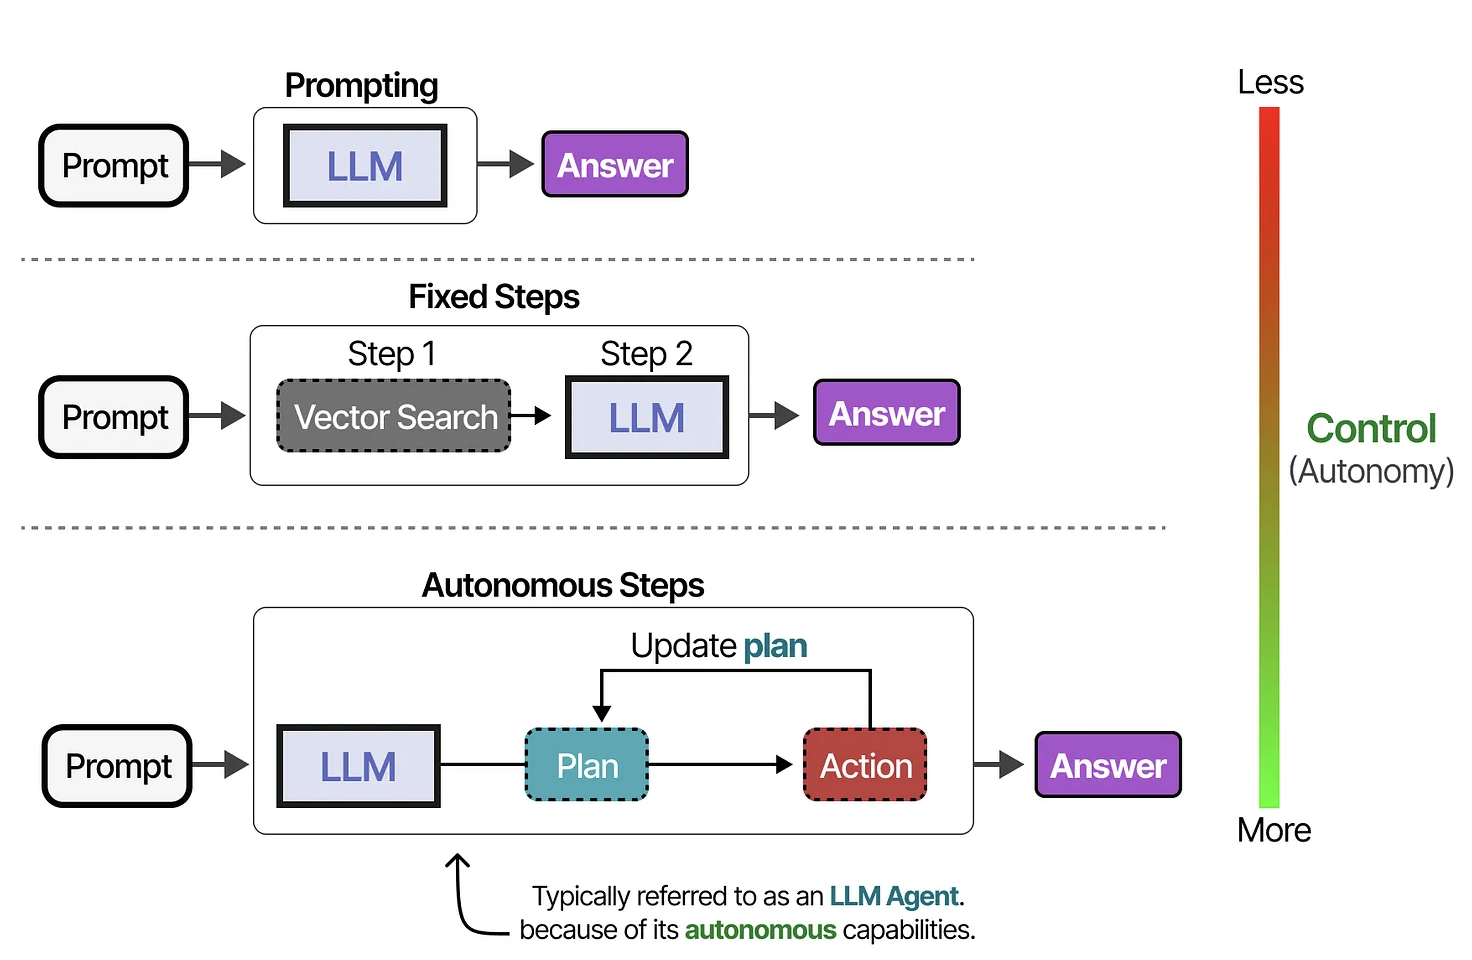
Large language models changed the input from code to English. An agent is a language model wired to real tools: files, terminal, browser, git. You say "save this to a file" and the agent actually saves the file. You say "push this to GitHub" and it pushes. The model picks the next step based on your request and what it sees from the last one. That loop is the agent.
Tools
Several agentic coding tools exist. Some are open source and free, some are proprietary and paid. All of them work on the same principle: you describe intent, the agent executes. The skill you practice in one transfers to all of them.
The landscape
These are the tools worth knowing in April 2026. Today we use OpenCode because it is open source, installs with one command, and works with free OpenRouter models out of the box.
| Tool | Form factor | Open source | Link |
|---|---|---|---|
| Cline | CLI, also a VS Code extension | Yes | cline.bot |
| Roo Code | VS Code extension (fork of Cline) | Yes | roocode.com |
| Aider | Python CLI, git-native | Yes | aider.chat |
| OpenCode | Terminal UI agent | Yes | opencode.ai |
| Qwen Code | Terminal agent, from Alibaba | Yes | qwen.ai/qwencode |
| Claude Code | CLI, from Anthropic | No | claude.com/claude-code |
| Codex | CLI, from OpenAI | No | github.com/openai/codex |
| Cursor | Full VS Code fork, paid | No | cursor.com |
Open-source tools work with any model provider, including OpenRouter's free catalog. Proprietary tools (Claude Code, Codex, Cursor) are locked to their vendor's models, usually behind a subscription. If you want to stay entirely free, stick to the first five rows.
OpenRouter
OpenRouter is a single API gateway in front of one hundred plus language models, including several free open-source ones. One API key, many models. Browse the current free catalog at openrouter.ai/collections/free-models. Today:
| Model | Best for | Context |
|---|---|---|
qwen/qwen3-coder:free | HTML, CSS, code | 262K |
deepseek/deepseek-r1:free | Reasoning, debugging | 128K |
meta-llama/llama-3.3-70b-instruct:free | General fallback | 128K |
Set up OpenCode
Three steps: install OpenCode, connect OpenRouter, start OpenCode. Open a terminal first. On Mac, use Terminal or iTerm. On Windows, use Windows Terminal. (For a smoother Windows experience, see the optional WSL note at the end of this section.)
1. Install OpenCode
Pick one of the two install paths below. Both give you the same opencode command.
Mac or Linux — one command, no Node.js required:
curl -fsSL https://opencode.ai/install | bash
Any platform via npm — works on Mac, Linux, and Windows if you installed Node.js above:
npm install -g opencode-ai
Windows users: if the npm install gives a permission error, close the terminal, reopen Windows Terminal as Administrator (right-click the icon → Run as administrator), and try again.
Verify the install:
opencode --version
2. Connect OpenRouter
Start the interactive auth wizard:
opencode auth login
OpenCode shows a list of providers. Use the arrow keys to highlight OpenRouter and press Enter. When it asks for an API key, paste the sk-or- key you saved earlier and press Enter. Your credentials are stored in ~/.local/share/opencode/auth.json.
3. Start OpenCode and pick a model
From anywhere in your terminal, type:
opencode
An interactive chat interface (TUI) takes over your terminal. You will see a > prompt at the bottom where you type instructions, and OpenCode's responses and actions appear above. At the bottom of the screen there are two modes you can toggle with Tab: Plan (OpenCode explains what it would do without touching anything) and Build (OpenCode actually does the thing).
Pick a free model with the slash command. At the > prompt, type:
/models
Scroll down to the free models (they have :free in the name) and press Enter. Good starting choices: qwen/qwen3-coder:free, deepseek/deepseek-r1:free, or meta-llama/llama-3.3-70b-instruct:free.
Leave OpenCode running. Everything in the next section happens inside this chat interface.
Optional — Windows + WSL: for better filesystem and terminal performance on Windows, install WSL, then run the curl install above inside your WSL terminal. Your Windows Desktop is reachable at /mnt/c/Users/YOURNAME/Desktop.
Build the site
1. Create a folder and generate the site
Open Finder on Mac or File Explorer on Windows. Go to your Desktop, right-click in empty space, and create a new folder called portfolio. Drag the profile photo and any other images you want on your site (project photos, research figures, anything visual) into this folder.
Now switch back to your terminal where OpenCode is running. Your first instruction generates the website inside the folder you just made. The prompt is long on purpose. Every phrase prevents a way the agent could go wrong, or pushes it toward a more interesting design. Vague instructions produce vague websites.
Copy the prompt below, paste it at the > prompt, and press Enter:
Create a single-file portfolio website in the portfolio folder on my Desktop, called index.html. Use only HTML and CSS in one file, no JavaScript, no external frameworks. Google Fonts are allowed. Make it visually distinctive with a deliberate color palette that has warmth and personality, not plain white or gray. Consider warm earth tones, deep jewel tones, or a modern editorial look. Pair two complementary Google Fonts: a serif or display font for headings and a clean sans-serif for body text. Add visual details: a colored accent bar or divider, soft shadows on cards, smooth hover transitions on links, generous whitespace between sections. Sections: a full-width hero with my name as a large heading, a one-line tagline, and a small visual element. An About section with a 2 to 4 sentence bio area. A Projects section with three cards, each showing a title, a one-sentence description, and a gentle hover effect. A Publications section as a clean chronological list with year markers. A Contact section with email and GitHub links as styled underlined text. Mobile-responsive with a single column layout below 700px. Use the image files already in the portfolio folder: place one that looks like a profile photo as a circular avatar in the hero, and use any others as decorative elements in the Projects section.
OpenCode will ask for permission before writing the file. Press y or Approve at each prompt.
When OpenCode finishes, ask it to open the file so you can see it:
open the index.html file in my default browser
Your browser launches with your new site loaded. Keep that browser tab open for the rest of the workshop. Every time OpenCode changes the file, you will return to the tab and press refresh.
2. Fill in your content
The site exists and your images are already placed, but the text is still placeholder. Replace the ALL-CAPS parts below with your real bio, projects, and publications, then paste the whole thing into OpenCode:
Update index.html. Change the name in the hero to 'YOUR NAME'. Replace the tagline with 'YOUR TAGLINE'. Replace the About section with this bio: 'YOUR BIO'. For the three project cards use: 1) TITLE - DESCRIPTION, 2) TITLE - DESCRIPTION, 3) TITLE - DESCRIPTION. Publications: PUB1, PUB2, PUB3. Email: YOUR_EMAIL. GitHub: YOUR_USERNAME.
Switch to your browser tab and refresh. Your real content is on the page. If OpenCode picked the wrong file for your profile photo, tell it: "the profile photo is wrong, use [filename] instead."
3. Iterate like a designer
The rest of the build is a conversation with OpenCode about how the site should look. Paste any of these, refresh the browser after each, then invent your own:
make the hero section dark mode with white text
the project cards feel flat, give them rounded corners and a soft shadow
change the color scheme to something warmer, like terracotta
The real skill you are practicing here is writing clear, specific requests. "Make it better" will not work. "The project cards look crowded, give them more padding and tighter headings" will. Be precise about what you see, what you want instead, and why.
4. If something breaks
Four fixes solve almost everything. When the site stops looking right, or OpenCode stops making sense, come back to this table and tell OpenCode the matching line.
| Problem | What to tell OpenCode |
|---|---|
| Something looks broken after a change | Type /undo — OpenCode reverts the last file change |
| OpenCode is confused or going in circles | start over, rewrite index.html from scratch with the same sections |
| You want to see the file contents | show me what index.html looks like now |
| Hit an OpenRouter rate limit | Type /models inside OpenCode and pick a different free model. If the key itself is rate-limited, quit with Ctrl+C, run opencode auth login, re-select OpenRouter, paste a fresh key, then run opencode again |
If the problem is not in this table, describe it to OpenCode in plain English. "The hero text disappeared after I asked for dark mode, help me fix it." The agent can usually debug its own output.
Publish
A repository named exactly your-username.github.io automatically becomes a live website at https://your-username.github.io. That is the whole trick.
1. Get a GitHub Personal Access Token
OpenCode needs permission to create a repository on your GitHub account. The cleanest way is a short-lived Personal Access Token that you paste into OpenCode when it asks.
Go to github.com/settings/tokens/new. Give it a name (OpenCode is fine), set Expiration to 7 days, check the repo scope at the top of the scope list, scroll to the bottom, and click Generate token. Copy the token that appears. It starts with ghp_. Save it in a note for the next minute. You will paste it into OpenCode and then never use it again.
2. Tell OpenCode to publish
Back in your terminal where OpenCode is running, replace USERNAME with your GitHub username in both places and paste:
Publish this folder as my personal website at USERNAME.github.io. My GitHub username is USERNAME.
OpenCode will start working. It turns your folder into a git repository, commits your files, and asks for your GitHub Personal Access Token so it can create the new repository and push. When the token prompt appears, paste the ghp_ token you copied a moment ago. OpenCode uses it once and does not save it.
Approve each shell command OpenCode asks to run. The whole sequence takes about 30 seconds. When it finishes, OpenCode reports the URL of your new repository.
If something fails partway through, describe what you see to OpenCode in plain English. The agent handles its own mistakes.
3. Visit your live site
Wait 60 seconds, then open this address in your browser:
https://your-username.github.io
If you see a 404 page, refresh in another minute. GitHub Pages is slow on the first deploy.
Reference
Daily workflow
- Open a terminal and
cdinto the folder you want to work in. - Run
opencodeto start the chat interface. - Type or paste your request at the
>prompt. Press Enter. - Approve file changes and shell commands when OpenCode asks.
- When you want to publish, ask OpenCode to re-publish the change.
Prompt patterns to know
- Generate: "Create X with these constraints: ..."
- Modify: "Update X to do Y. Keep everything else the same."
- Inspect: "Show me what X looks like now."
- Undo (slash command):
/undo— OpenCode reverts the last file change. - Switch model:
/models— pick a different OpenRouter model inside the TUI. - Reset: "Start over. Rewrite X from scratch with the same sections."
- Publish: "Re-publish this change."
Free models on OpenRouter
qwen/qwen3-coder:free. Code, HTML, CSS.deepseek/deepseek-r1:free. Reasoning, debugging.meta-llama/llama-3.3-70b-instruct:free. General fallback.
Browse the full free catalog at openrouter.ai/collections/free-models.
Further reading
- OpenCode documentation. Official docs, feature reference, settings.
- OpenCode on GitHub. Source code, issues, community.
- OpenCode on Windows + WSL. If you want the smoother Windows path.
- OpenRouter free models. The live list.
- Roo Code docs. The other open-source VS Code agent, worth knowing.